Monday, October 11, 2010

Before & After - Some Of What We've Accomplished In The Past 9 Days...

Peggy and I have really been enjoying the past nine days of labor intensive outdoor work cleaning up mom's overgrown acreage under these big beautiful Utah skies.
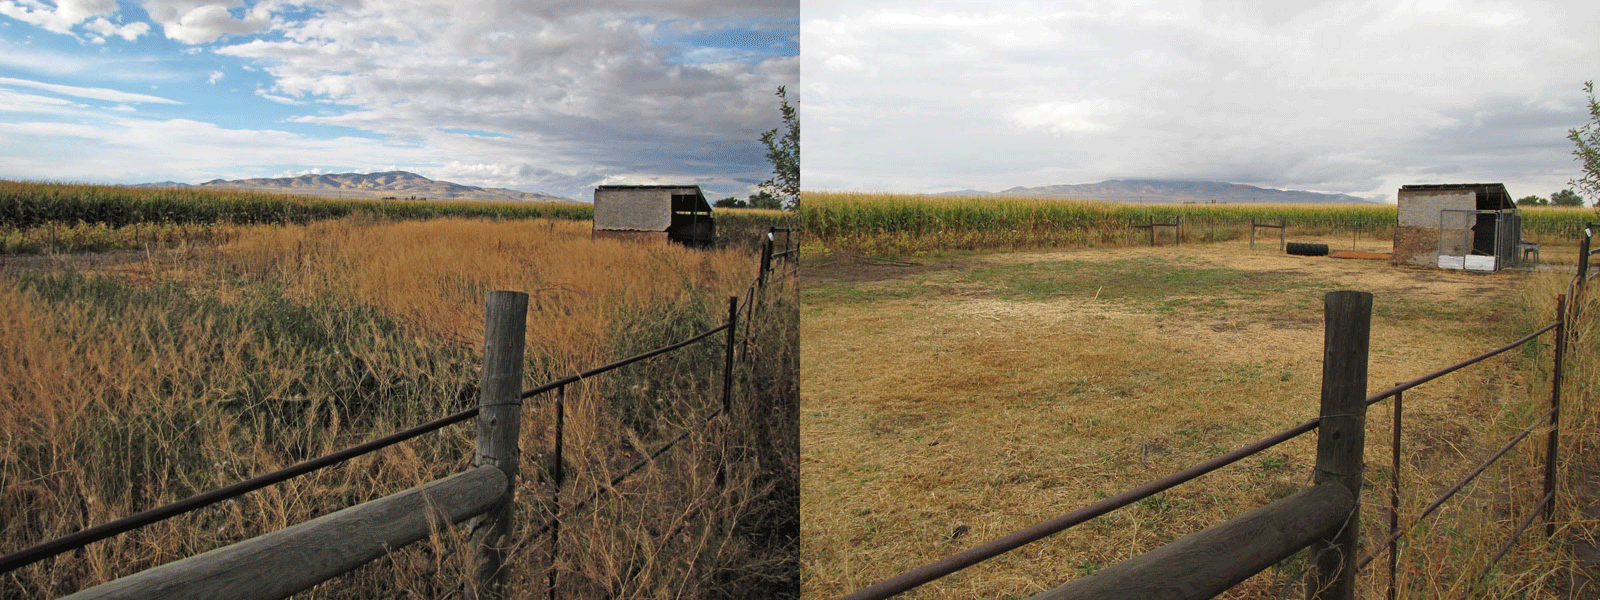
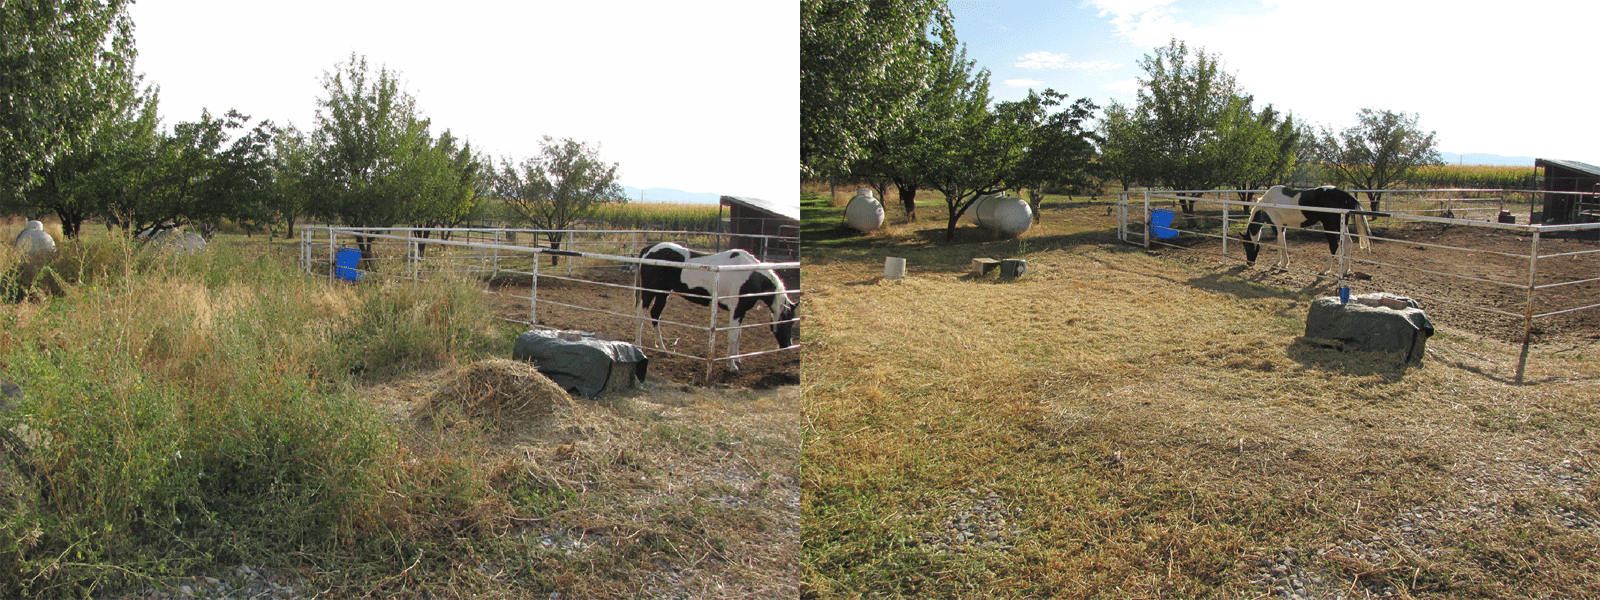
The four photos below are before and after pictures of the orchard and a large fenced area at the back of her property which could be divided up between vegetable gardens and the raising of farm animals such as chickens & goats.
Much of this area was 4 to 6 feet deep in a thick nasty tangle of weeds, brush, & cockleburs, and quite a challenge to deal with, but we're getting there!
I must say here that, if this were my place, I'd have a herd of goats to manage the weed problems, to help fertilize the gardens, and to provide milk for drinking and the making of goat yogurt and cheese, and, that being said, we'll move on to the reality of the present circumstances.
Click on all photos to enlarge - © 2010 jim otterstrom



Weed Management With Infernal Combustion Machines!

Click on photo to enlarge - © 2010 jim otterstrom

Yes, we accomplished a lot in a very short period of time mainly because my mother has this little John Deere tractor mower that rose way beyond the task it was designed for, which is basically to mow big lawns, which is why mom bought it.
We were in dire straits here with too many chores to do and not nearly enough time to address them all in some sort of sustainable way before winter sets in.
So, I'm certainly not proud of the fact that we converted about 7 more gallons of fossil fuel (on top of what we blew through the U-Haul truck) into the C02 which is every day rendering our planet less habitable for humans.
But we came here to help my mother, and, at this point in time, I have to do that partly within the context which she lives, and, as I said above, if this was our place things would be done in a different way.

Weeds Ready For the Chipper/Shredder
Click on photo to enlarge - © 2010 jim otterstrom

Peggy and I brought our electric chipper/shredder with us because we knew there was going to be a mountain of stuff we could use for mulch and compost and we're just getting started with that.

Click on photo to enlarge - © 2010 jim otterstrom

This little pile is just the first trailer full of chipped and shredded weeds headed for the compost heap. The horse manure in the corral will be another essential ingredient.
Note the empty bottle of Negra Modelo in the John Deere's beer holder, sometimes it's so obvious that I'm just a redneck farmer at heart.
The above photos show only a part of the many problems we've had to address in these 9 days, from a huge overgrown lawn to runaway shrubbery and weeds in the flower beds around the house, to broken door latches, lost keys for important locks, automatic sprinkler malfunctions, a broken fitting in the plumbing for the well, and so many other things I've already forgotten.
But the three of us are having a lot of fun together and that's what's important.

Labels: , , , , , , , , ,

Wednesday, September 02, 2009

Tool-Shed/Workshop/Studio/Beer-Garden Nearing Completion

Front Entrance & West Facing Beer Garden Patio
Click on photo to enlarge - © 2009 jim otterstrom
All summer long we've been enjoying our meals out here on this cozy little patio decorated with the recycled artifacts of the lost (Mid-Twentieth Century) civilization I grew up in.

South Facing Wall With Big WindowClick on photo to enlarge - © 2009 jim otterstrom

I just finished siding the north and south walls of the shed, the day before yesterday, then painted the recycled window olive drab.

The siding on these walls all comes from four 10 foot long sections of weathered picket fence we salvaged from a neighbor several years ago when he replaced it with chain link. I still have three more 10 foot sections for some future project.

This beautiful wood was either going to be kindling for a fireplace or would've ended up at the county landfill.

The big window came from an old lodge up here that was being remodeled some decades ago and fitted with new windows. I got several of them free of charge, just for hauling 'em away, and they've been used here over the years as tomato hot-houses and even a temporary home for baby chicks once. I have at least two more of these I'm saving for a garden potting-shed.


North Facing WallClick on photo to enlarge - © 2009 jim otterstrom

On this wall I staggered the old fence pickets randomly, using as many of the original nail holes as possible and then drilling new holes where they were needed.

The very old marble-reflector porcelain-on-steel DETOUR sign was given to me by a friend & neighbor some years ago.


Workbench Click on photo to enlarge - © 2009 jim otterstrom

As you might guess, I spend a lot of time out here now tinkering around with my various hobbies & crafts. Again, most everything here was built from scrap, salvaged wood, or recycled junk. The 'carvings' at each side of the window are from an old piece of junk furniture we dismantled (I have 3 more of them too).

The workbench and ceiling are from salvaged wood, and the wall around the window is covered with empty seed packets used in our vegetable garden, which I adhered to the wall then tinted with amber shellac. The trim by the ceiling is recycled wiggle-board.

The small stained-glass windows hanging there were the first two windows I made, for a stained-glass class I took way back in the early 1970s. The tulip design was made from a very simple beginner's pattern.


Beer Wall Click on photo to enlarge - © 2009 jim otterstrom

As some of you may be aware, we have several friends who get together now and then to enjoy the many delicious craft beers being brewed these days, so, just for fun, I decorated the back wall of the shed with nearly 100 different beer carton graphics, giving them the same amber shellacked finish as the seed packets.

These are the actual cardboard six-pack (or four-pack) cartons which I cut out and pieced together one by one. They were mostly donated to me by my beer drinking buddies, Bill and Denny (thanks guys), but I've had just about every one of these beers over the years. Ohhhh, and so many more!

They make an appropriate addition to the workshop considering that the adjoining patio is the beer garden which will be served by the tap in the front wall, starting on September 27th, when we will be christening the joint with keg of good beer and a shrimp-kabob barbecue.

Jim In His Workshop/Studio This MorningClick on photo to enlarge - © 2009 peggy otterstrom

Peggy took this shot of me in the studio about 8:45 this morning, a quite common sight around here now.

I have a just little more work to do inside, finishing up trim on the interior west wall.

Click here, here, & here, to see older posts of the beginning and evolution of the project...

Labels: , , , , , , , , , , , ,

Monday, December 29, 2008

Update On The Earth Home Garden Temple Of The Lost Civilization, Tool Crib, Workshop, Fallout Shelter, Den Of Antiquities, And Beer Garden Pub...

.....
The Chernobyl Door
Click on photo to enlarge - ©2008 jim otterstrom

One can't erect a monument of junk to the folly of the Twentieth Century without including a reference to our nuclear adventurism, so I've christened my new shed door in honor of that most infamous of meltdowns thus far.

I kept my eyes peeled for months, looking for an old beat up door I could salvage for the shed, to no avail. It finally came to the point where winter weather was bearing down and I had to buy a door.

The cheapest sturdy door I could find cost $88 at Home Depot, and, aesthetically, it was completely unnacceptable as an entrance for my funky Den Of Antiquities, but it was modifiable.

It's a steel door! Or, I guess I should explain, a wood frame with a thin steel skin attached to both sides, filled with expanded foam. And, It was painted white. Disgusting!

The day after I brought it home I was walking on a back street near the airport with Dallas and saw a perfectly good used wooden door sitting out with someone's trash. So, I figured I'd come back and carry it home, with some help from Peggy, and return the ugly metal door to Home Depot and get my 88 bucks back. However, by the time I went home, got Peg, and came back, the door was gone.
Alas, I was stuck with the sterile white door!
What to do?

To match the old junk that I built my new shed from, I decided to transform the new door into old junk!

Really a quite simple process, if a bit time consuming, but art takes time...

Sanding The Brand New DoorClick on photo to enlarge - ©2008 jim otterstrom

The first step in transforming the door into something I could live with was sanding off most of the white paint. This took less than an hour to accomplish. I left a little paint in the crevices of the stamped panels for character (or, out of laziness, whichever you'd prefer).

My plan was then to spray the unpainted metal door with a mixture of sea salt (from our condiments cupboard) and water, until it rusted to a nice reddish brown patina.


Detail Of The Sanded Door
Click on photo to enlarge - ©2008 jim otterstrom

What I hadn't anticipated, was that the steel under the white paint was galvanized, zinc coated to inhibit the formation of rust. Once I realized this, I had to spend many, many, more hours sanding off the stubborn galvanizing so the door would actually rust (nice stuff to breathe that zinc dust, but my beard doesn't accommodate a sanding mask very well).

Days later, once the door was rusting nicely (and my lungs were beginning to recover), I set the jamb and hung it in place. I installed a metal threshold, measuring the bottom clearance to make sure I had allowed enough room for the rubber seal to compress. Everthing looked like it would fit perfectly until I shut the door. It was a pretty tight fit at the bottom seal so I thought I'd open it back up and lube the rubber with some graphite.

But the door was stuck! I pushed & pushed, but the damned thing was frozen shut! Finally, I thrust all my 195 pounds against it with enough force to break the seal, which also peeled off the front metal skin to about six inches up from the bottom.
Hmmmmm! Now, how am I going to repair this disaster?

I got out the tin snips and raggedly trimmed about 1/4 inch off the bottom of the metal skin, screwing it back down with drywall screws.
Perfect!!! Just what my door needed, some authentic jury-rigged character borne of indomitable American ingenuity!

Almost Finished
Click on photo to enlarge - ©2008 jim otterstrom

Add some vintage porcelain enameled PG&E signs to the door, an old Cold War Fallout Shelter sign, and there you have it!

~The Chernobyl Door~

Just beautiful!!!
If I do say so myself...

I still have to distress (beat up with secret aging techniques) & paint the cheesy spliced jambs with some appropriate color, like flat olive drab or battleship gray, and, add a few more of my fence signs at the left of the door, but you get the idea.


;~)

Labels: , , , , , , ,

Friday, November 07, 2008

My Current Project --- Eleven Photos

A Place For Jim's Junk
~One Mans Trash Is Another Mans Treasure~
Click on all photos to enlarge - © 2008 jim otterstrom

This post consists of the above photo, and ten more below, with comments.
Using mostly recycled and scrap materials, I'm building a badly needed tool shed as an addition behind our 'Temple Of The Lost Civilization' hop arbor.

The shed will actually be a small multi-purpose room. There will be a workbench along the south facing wall beneath the big window, shelves and storage for most of my tools, and the brick patio area will also serve as a hangout when friends come over to solve the world's problems over a few good beers (More likely we'll forget the problems and just enjoy the beer).

The Beginning
Last summer I built the floor with deeply discounted planks from the local lumberyard that were too twisted and split for retail sale. With some strong persuasion I got them to screw down flat to joists (Which are sitting on concrete piers) I recycled from the old porch we tore out in 2004 (Notice our first dusting of snow on the floor). Shortly after building the floor I also laid the red-brick patio you saw in the first photo. This first wall was tilted up a few weeks ago (Nobody said I was fast).


Taking Shape
The walls were framed from a pile of salvaged 2x4s I've had around here for years, supplemented with another batch of twisted studs I bought dirt cheap, and forced into position with a big pipe wrench as I nailed them down. I did need to buy 12 new studs to finish the side walls. The rafters are recycled deck boards from our old porch but I had to buy 4 sheets of plywood to sheet the roof. There were some fiberglass shingles left over from re-roofing the house 6 years ago so I only had to buy two bundles to complete this roof (Note that the front wall was re-thought and the window moved closer to the door since this photo).


South Facing Window
I dragged four of these great windows home from somebody's remodel job over a decade ago and finally got to use one of them (The window header was made from two salvaged 2x8s). This is where the workbench is going to be and the window will provide a well lighted space for me to work on my plethora of little hobbies & crafts (Freeing up the kitchen table). I think that's why the cute chick is washing my new panes for me, so I'll spend more time out here and she can have her kitchen back!


Speaking Of Hobbies
This front, opening window, will serve as ventilation and also includes an outdoor counter where a few friends can sit and nurse a beer (Believe me, that does happen around here). And, I decided to take advantage of the afternoon sun by building some small bottle windows up in the west facing eves. One of those crafts I've been longing to put into practice, seeing how I've saved up some hundreds of old bottles over the years too. Did I ever mention that I'm a pack-rat by nature?


Bottle Windows
The windows were made to fit the framing of the wall so they're not all exactly the same size.

I built box frames from 2x4s and then cut a piece of plywood to fit inside each frame. After tracing the profiles of the desired bottles onto the plywood I cut out the bottle-shaped holes with a sabre-saw before nailing the pieces into place.

I decided that a hot-glue gun would be a quick & easy way to hold the bottles in place until I mixed the mortar (After a frustrating attempt with black silicone caulking, which, I already knew, sets up way to slow). Then mortar was applied heavily to both sides (One side at a time until they set up a bit) and sculpted around the bottles to finish off the windows.


Bottles In The Wall I blacked out the front window here so I could give you a better idea of how the bottles look with the afternoon sun shining through them.


Don't Fence Me In
~How The West Was Lost~

Call some place paradise and they'll fence it in...

I collected all these fence company signs, and many more, over a quarter of a century ago. The greater portion of them are embossed tin, but a large number of the oldest ones are heavy enameled porcelain on steel.

For me they're a perfect and artfully graphic metaphor for the scourge upon the land we call civilization and progress.

Most of them are also reminders of a now historic time when we shared party-lines with phone numbers that had word prefixes such as Dickens, Diamond, Plaza, Capitol, or Exbrook. Some are really ancient, having only four or five digit numbers, with no prefix at all.


More Relics
The purple-tinged 1937 Ford headlight lens I found many years ago in a junk store (For a couple of bucks) will now serve as a porchlight and the extremely rare 7up screen will help keep flies out of my little studio/shop. I've had the screen about 40 years, and they used to be everywhere, but I haven't seen another since I rescued this one from an old saloon door in the late 60s. The siding above the counter is old redwood planks I hauled home from some ruins, the fence signs are screwed to weathered recycled plywood, the entire shed is wrapped in left-over tar-paper from a neighbors playhouse project, and eventually the other walls will be sided with well-weathered gray pickets salvaged from several hundred feet of discarded picket fence I purloined from another neighbor who replaced it with chain link (The same wood that frames the 7up sign).

If you could enlarge the picture enough you'd see that the rusty little sign left of the 7up screen, from an old rail yard fence, has the phone number 201-14. How old is that?

The Ford script underneath the '37 Ford headlight was made for me by Craig, one of my beer-drinking buddies, who also happens to do lost wax casting as a jewelry maker and sculptor.

It was made for my 1942 Ford Pickup which had a rare size script that Ford only made that one year. I was so taken with Craig's fine work and generosity, that, when I sold the truck, some decades ago, I couldn't part with the hand-made script.

You Like It, It Likes You
How many of you are old enough to remember these screen door ads? Back when advertising slogans were simple and little mom & pop stores could make some extra money selling soft drinks while getting a free screen door in the bargain.

When, as kids, we collected those discarded bottles along dusty dirt-road shoulders and turned them back in for penny candies and 5 cent soda pop.
Back when we looked forward to the future and all the modern conveniences that were about to transform our sleepy simple rural existences into lives of leisure, abundance, and luxury.


Way, Way, Back...
...where movies and photos were black & white, and all my fond memories are fading to sepia tone.

~From The Archives Of~

Earth Home Garden, The Temple Of The Lost Civilization, and The Last Outpost Bar & Grille.

Labels: , , , , , ,

Tuesday, October 31, 2006

Local Color - Austin, Nevada


Click on photo to enlarge - photo by Peggy

We stopped at this old saloon in Austin, Nevada for a bit of local color and to wet my dusty whistle with a cold beer. Our 70 some year-old bartender, Curly 1 (a nickname taken from her license plate), has lived in this tiny mountain town for 34 years and told us the population was 800 when she first came here, but the Austin of today has just 140 residents.

Labels: , , , , ,

Tuesday, January 31, 2006

A Re-cap Of Last Friday...;~)


Click on photo to enlarge

For my beer buddies, Bill, Frank, Deb, Denny, and Craig...

...enough said?

;~)

Labels: , ,

Monday, August 08, 2005

Flowering Cascade Hops


Click on photo to enlarge

Hops are flowering right now on our Temple Of The Lost Civilization pagoda.

The idea was for my friend Bill to brew some of his great beer using these hops, but so far their quality hasn't been quite up to snuff for brewing.

One of these days maybe... Posted by Picasa

Labels: ,

voicexml
voicexml
Creative Commons License
This work is licensed under a Creative Commons Attribution-Noncommercial-No Derivative Works 3.0 Unported License.