...Live, at Earth Home Garden Click on any photo to enlarge
 All photos © 2007 jim otterstrom
Orchid displays a bowl of 'batter' for Acorn Fritters during the class she presented here on Sunday, November 18th. To me, the "fritters" have a taste something like the best vege-burger I can imagine. Orchid came up Saturday night to prepare for the class, but this photo is from late in the class on Sunday, so, we need to go back and show you how we got to this point.
The photos were taken over a two day period, during preparation & also during the class, but they do not cover every detail of the process.
See Orchid's instructions at the end of the post for a step by step tutorial.
First, You Will Need Acorns! Orchid collected these California Black Oak Acorns here in the San Bernardino Mountains where they were once a staple for the Serrano Indians who lived here during the warmer months, long before we came along. The Black Oak leaves in the picture are from a tree native to our yard. Before processing, the acorns should be dried (they don't need to be dried if you're going to process and eat them all right away). This can be done outdoors if you have a safe place to dry them, out of reach of squirrels and other foragers. Or you can dry them in the oven (see Orchid's instructions at bottom of post).
Orchid's Acorn Cracker And now, the Saturday night preparations (before the class).
This cool little device is actually a pecan cracker but it also happens to be perfect for opening acorns. It has a screw adjustment for different sizes of acorns.
The Acorn Nut Once acorn nuts are out of their shells they somewhat resemble large peanuts, but they are loaded with bitter tannin that must be leached out of them before they are edible. Tannins are not only bitter, they're poisonous, and toxic to our livers, but acorns are also very nutritional and high in protein once the tannins (and the bitterness) are gone.
Acorn Nuts In A Pine-Needle Bowl
 Once you have the dried acorn nuts out of their shells, like this, they must then be coarse-ground to about to about 1/8th inch nuggets for leaching (see Orchid's instructions at bottom of post).
Leaching Tannin From The Acorns
 Orchid has dried & chopped a large batch of acorns for the class, and has been leaching the tannins out them for about 2 weeks.
She does this by tying up the coarse-ground dried acorns in cotton/cheesecloth towels (from Smart & Final), or in paint strainers from the hardware store, and soaking them in a tub or utility sink. She rinses the acorn mush & changes the water at least once a day until the tannins are gone.
The acorn batch Orchid brought with her wasn't quite finished, so, in the above picture, she's boiling out the last of the tannins.
Grinding Flour
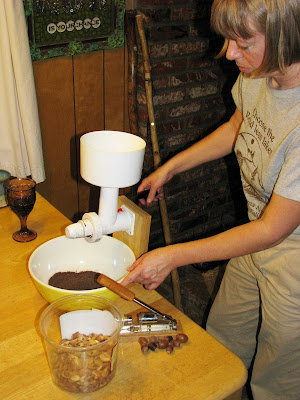 When the acorns are fully leached of tannins, and completely dry, they can then be ground into meal or flour with this nifty hand-operated flour mill.
Making Acorn Corn Bread
 Now it's Sunday morning, the day of the class, and Orchid is making a batch of Acorn Corn Bread (see bottom of post for instructions) for us to have with breakfast, and to share with the class.
The Class Begins
 Orchid gives an oral history of oaks and acorns, and their huge impact on the development of civilization.
Clockwise, from top center: Orchid, Debbie, Meredith, Michele, Cheri, Samantha, Deb, Peggy, Robbie, & Christie.
I'm manning the camera, as usual.
Oak - The Frame Of Civilization
 For those interested in the importance of Oak to the development of humankind, this is a must-read.
Key Lime-Aid With Chia Seeds
 It's Break-Time, so Debbie and Meredith enjoy some home-made Key Lime-Aid with Chia Seeds. Orchid brought the chia seeds (native to the San Bernardino Mountains) and Deb provided the Key Limes (from her garden down in Murietta).
Meredith & Debbie are local school teachers and their home is on acreage at the east end of the valley, property which also includes a huge greenhouse where they may host community gardening in the future.
You Had To Be There
 Robbie & Christie mix it up during the break.
These guys are our good buddies, part of our social group. We've been on the Xeriscape Tour Committee together for years, they recruit us for talks on native-plant gardening, pine-needle basketry, or car-free living at their Sierra Club meetings etc., and, we go to the same music festivals (Strawberry & Millpond).
It's always a joy to be in their company.
Back To Class
 Orchid uses a Cuisinart to coarse chop acorns before soaking and leaching them.
They are gound to approximately the same size as chopped peanuts, like the ones used as bird & squirrel food.
A Sack Of Acorn Mush
 In one of the earlier photos we saw acorns being boiled in cotton/cheesecloth towels wrapped & tied with rubber bands. That is one method of containing the acorns for leaching, but you can also use a readily available paint strainer (as shown here) to soak and leach your acorns. Just soak them in a sink or tub, changing the water, at least daily, for a week or two, until all of the tannins are leached out. The water will be relatively clear once the tannins are gone.
Tasting The Goods
 After Orchid showed us how to process acorns, she treated us to some of the delicious stuff you can make with them. Above is the Acorn Corn Bread she was making (with some of her previously processed acorn flour) Sunday morning before the class (see above photo titled 'Making Acorn Corn Bread').
Frying Up Acorn Fritters
 The scrumptious Acorn Corn Bread was a hit with everybody, but these fritters are just something else (see recipe at bottom of post)! They were made with the acorn 'grits' we finished leaching last night, and with acorn meal from a previous batch.
These were so good we couldn't cook them fast enought to keep up with the demand!
After Class Entertainment
 Once class was over, and we had gorged ourselves on the bounty, we broke out a little beer & wine, and were treated to a live folk/blues jam by Cheri & Robbie.
Below is a copy of Orchid's instructional handout (with recipes) from the class if you get the notion to try this yourself.
Please read it carefully...
MY ACORN PROCESS:
Dry the acorns. Drying is only necessary if you are going to store them, otherwise they can be eaten right away.
If you store without drying, they can mold. I believe First Nations people would use fresh ones to make soup at the acorn gathering festivals, which would have been preferred.
I dry them in the oven, by the pilot. If there is no pilot, use the oven light. Baking pans suspended over floor registers also work.
The idea is to not let the acorns get too hot, or it may bake the tannins in, making the tannins harder to remove in the leaching process.
I was drying in pans in the sun, until my local squirrel came around and started chattering about all the acorns: that he was going to take some. I got out there in a hurry and put them inside, barely beating him.
Crack the acorns. Something to do in the evening by the fire. I compost the shells. One reason to dry the acorns is that it makes cracking easier. Cut out any black spots and stripes.
Soak the whole acorn meats overnight. I do this because my blender won't grind them dry. Acorns are very hard. Also, soaking for more than 24 hrs makes it easier to remove skins, which have more tannins.
Grind the soaked whole acorns very coarse, about 1/8" pieces. I do this in a blender or cuisinart. I call this coarse mush. I put the coarse mush into a paint strainer, inside a big enamel pot. The mush needs to be coarse, or it will not stay inside the strainer. The paint strainer could also be cheescloth in a colander, a muslin bag, or a pillowcase that you don’t mind turning brown.
These options would require more squeezing or pressing during the water changing process to get out all the tannins with every change of water.
Soak the mush and change the water at least once a day. Soaking removes the tannins. You can change the water twice a day or more to go faster.
This part seems to take me about 5-7 days, more or less, using dried acorns.
Hilla Futterman said in her acorn class that with fresh acorns it took her about 3 days. I test the mush by chewing on the largest piece in the batch, because the tannins soak out faster from the smaller pieces.
When the mush no longer has a bitter or astringent taste, I go to the secondary drying step. Also, at this stage, the water should be clear.
Pouring the rinse water into a porcelain sink will dye it brown. Stainless steel doesn’t dye. The rinse water can go in the garden, or to a dyer-tannins fix dye, and also tan leather. Removing all the tannins is crucial, as tannins are toxic to the liver.
When the largest pieces taste bland and are not astringent, and/or the water runs clear, they are done soaking and ready to dry.
Dry the coarse mush in the oven on the pilot light. If grinding in a blender, regrind when it is not fully dry, so it is softer. If using a traditional flour grinder, the mush must fully dry to get fine flour.
I sift it, and use the finest flour in pancakes & cornbread. The stuff that is more grits consistency, I use in fritters.
Pancakes: Fritters for Two:
1/3 c wheat or buckwheat ½ to 2/3 c acorn grits
1/3 c cornmeal 1 to 2 eggs
1/3 c acorn meal 1/3 c buttermilk
pinch baking powder 1 tsp miso paste
salt 1/2 onion
egg handful chopped parsley
milk or water to thin 1 heaping tb parmesan cheese
salt & pepper
Cornbread: Cornbread recipes usually call for half cornmeal & half wheat flour. Replace wheat flour in your favorite recipe with half to all acorn flour.
This material was inspired by Hilla Futterman’s acorn class and is written in memoriam. Please use this information with care, and at your own risk.
No part of any wild plant should ever be eaten without positive identification.
Orchid Black © 2006 Any duplication must be by permission, and must contain this information.
PH: 626-794-1275 FAX: 626-794-6992, orchid@pitchersage.com, www.pitchersage.com 1443 E. WASHINGTON BLVD. #163, PASADENA CA 91104
Orchid's Acorn Process reprinted at Earth Home Garden by permission.
Labels: community involvement, early man, edible native plants, education, food production, home-cooked meals, recipes, San Bernardino Mountains
 Click on photo to enlarge - © 2009 jim otterstrom


