Thursday, March 04, 2010

New Pine Floor & Door For The Sewing/Crafting Room

First, We Tore Out The Carpeting... Click on photo to enlarge - © 2010 jim otterstrom

Our current project is the renovation of the sewing room.

Before we could start on the fun stuff we had to tear out our vintage 1969 lime green carpeting and pull up the foam padding to reveal the plywood sub-floor beneath. Then we pried off the nasty carpet tack strips at the perimeter and pulled out all the staples which held the padding in place. Once that was done we had a clean slate to work with.

To keep it simple and affordable, and to avoid using exotic hardwoods or synthetic laminates, we went with standard 1x12 pine planks from our local lumber yard.

We used Taylor's 2071 Tuff-Lok solvent-free floor adhesive to adhere the boards to the sub-floor, and then nailed the planks down, three nails across, every two feet, with square shank copper boat nails to add beauty and help prevent cupping of the wide planks.

Yes, pine is soft, and it does wear faster than hardwood, but in my opinion it wears beautifully.

We made the decision to use pine planks after looking at photos of wide-plank pine floors in old houses, some of them over 100 years old. That's durable enough for our purposes.

Square Shank Copper Nails Add Beauty & Durability
Click on photo to enlarge - © 2010 jim otterstrom

Laying these floors is a pretty simple straightforward job. We measured and cut all the boards first and laid them in place to make sure everything was square, then we picked them all back up again, and glued & nailed them down one at a time. I pre-drilled the nail holes in the planks to prevent splitting and the 3-inch long 8-gauge copper nails (from Faering Design) go way into the thick plywood sub-floor.

We did the living room floor by the same method nearly 5 years ago and it's still as flat and solid as the day it was finished.

A New Pine-Panel Door Click on photo to enlarge - © 2010 jim otterstrom

We also relpaced the beat up holllow core door with a pine-panel door to match the floors.

The door isn't the pre-hung type so I had to buy door jamb stock and build the casing myself.

I've hung a lot of doors in my time but this one was a bit of a chore because standard door jamb sets are too wide for our walls. They're milled to fit 4x4 framed walls with drywall on both surfaces, but our cabin doesn't have drywall, only a much thinner wood paneling, on the interior walls.

So I had to rip about 3/4 of an inch off the jamb stock to make it fit properly, not really difficult, just a little extra work.

The New Floor & Door Together
Click on photo to enlarge - © 2010 jim otterstrom

This is how the entrance to the room looks now with the door installed and a preliminary sanding done on the floor.

The Semi-Completed Floor
Click on photo to enlarge - © 2010 jim otterstrom

This photo shows the floor before the preliminary sanding so you can still see the pencil lines I used to lay out the nailing pattern. I have since sanded off the pencil lines and any obvious stains or rough spots in the wood which still needs to have a finish applied and baseboard installed.

Nearly Completed Door
Click on photo to enlarge - © 2010 jim otterstrom

The pine panel door as it looks from inside the sewing room.
The trim molding has been applied, the finish nails recessed with a nail set, and the holes filled with wood dough. A little more sanding and it's ready for a few coats of satin clear finish.

Labels: , , , , ,

Tuesday, September 15, 2009

Painting The House...

...I spent much of today on this ladder Click on photo to enlarge - © 2009 peggy otterstrom

The past several days we've been prepping and painting the house in between our other activities around here. We're hoping to have the whole thing done before the weather turns on us.

It was 25° F on our back porch this morning, but the tomatoes, eggplant & squash are doing fine in the greenhouse thus far, and the vegetables growing outside are relatively cold tolerant.

Labels: , , , , ,

Wednesday, September 02, 2009

Tool-Shed/Workshop/Studio/Beer-Garden Nearing Completion

Front Entrance & West Facing Beer Garden Patio
Click on photo to enlarge - © 2009 jim otterstrom
All summer long we've been enjoying our meals out here on this cozy little patio decorated with the recycled artifacts of the lost (Mid-Twentieth Century) civilization I grew up in.

South Facing Wall With Big WindowClick on photo to enlarge - © 2009 jim otterstrom

I just finished siding the north and south walls of the shed, the day before yesterday, then painted the recycled window olive drab.

The siding on these walls all comes from four 10 foot long sections of weathered picket fence we salvaged from a neighbor several years ago when he replaced it with chain link. I still have three more 10 foot sections for some future project.

This beautiful wood was either going to be kindling for a fireplace or would've ended up at the county landfill.

The big window came from an old lodge up here that was being remodeled some decades ago and fitted with new windows. I got several of them free of charge, just for hauling 'em away, and they've been used here over the years as tomato hot-houses and even a temporary home for baby chicks once. I have at least two more of these I'm saving for a garden potting-shed.


North Facing WallClick on photo to enlarge - © 2009 jim otterstrom

On this wall I staggered the old fence pickets randomly, using as many of the original nail holes as possible and then drilling new holes where they were needed.

The very old marble-reflector porcelain-on-steel DETOUR sign was given to me by a friend & neighbor some years ago.


Workbench Click on photo to enlarge - © 2009 jim otterstrom

As you might guess, I spend a lot of time out here now tinkering around with my various hobbies & crafts. Again, most everything here was built from scrap, salvaged wood, or recycled junk. The 'carvings' at each side of the window are from an old piece of junk furniture we dismantled (I have 3 more of them too).

The workbench and ceiling are from salvaged wood, and the wall around the window is covered with empty seed packets used in our vegetable garden, which I adhered to the wall then tinted with amber shellac. The trim by the ceiling is recycled wiggle-board.

The small stained-glass windows hanging there were the first two windows I made, for a stained-glass class I took way back in the early 1970s. The tulip design was made from a very simple beginner's pattern.


Beer Wall Click on photo to enlarge - © 2009 jim otterstrom

As some of you may be aware, we have several friends who get together now and then to enjoy the many delicious craft beers being brewed these days, so, just for fun, I decorated the back wall of the shed with nearly 100 different beer carton graphics, giving them the same amber shellacked finish as the seed packets.

These are the actual cardboard six-pack (or four-pack) cartons which I cut out and pieced together one by one. They were mostly donated to me by my beer drinking buddies, Bill and Denny (thanks guys), but I've had just about every one of these beers over the years. Ohhhh, and so many more!

They make an appropriate addition to the workshop considering that the adjoining patio is the beer garden which will be served by the tap in the front wall, starting on September 27th, when we will be christening the joint with keg of good beer and a shrimp-kabob barbecue.

Jim In His Workshop/Studio This MorningClick on photo to enlarge - © 2009 peggy otterstrom

Peggy took this shot of me in the studio about 8:45 this morning, a quite common sight around here now.

I have a just little more work to do inside, finishing up trim on the interior west wall.

Click here, here, & here, to see older posts of the beginning and evolution of the project...

Labels: , , , , , , , , , , , ,

Monday, December 29, 2008

Update On The Earth Home Garden Temple Of The Lost Civilization, Tool Crib, Workshop, Fallout Shelter, Den Of Antiquities, And Beer Garden Pub...

.....
The Chernobyl Door
Click on photo to enlarge - ©2008 jim otterstrom

One can't erect a monument of junk to the folly of the Twentieth Century without including a reference to our nuclear adventurism, so I've christened my new shed door in honor of that most infamous of meltdowns thus far.

I kept my eyes peeled for months, looking for an old beat up door I could salvage for the shed, to no avail. It finally came to the point where winter weather was bearing down and I had to buy a door.

The cheapest sturdy door I could find cost $88 at Home Depot, and, aesthetically, it was completely unnacceptable as an entrance for my funky Den Of Antiquities, but it was modifiable.

It's a steel door! Or, I guess I should explain, a wood frame with a thin steel skin attached to both sides, filled with expanded foam. And, It was painted white. Disgusting!

The day after I brought it home I was walking on a back street near the airport with Dallas and saw a perfectly good used wooden door sitting out with someone's trash. So, I figured I'd come back and carry it home, with some help from Peggy, and return the ugly metal door to Home Depot and get my 88 bucks back. However, by the time I went home, got Peg, and came back, the door was gone.
Alas, I was stuck with the sterile white door!
What to do?

To match the old junk that I built my new shed from, I decided to transform the new door into old junk!

Really a quite simple process, if a bit time consuming, but art takes time...

Sanding The Brand New DoorClick on photo to enlarge - ©2008 jim otterstrom

The first step in transforming the door into something I could live with was sanding off most of the white paint. This took less than an hour to accomplish. I left a little paint in the crevices of the stamped panels for character (or, out of laziness, whichever you'd prefer).

My plan was then to spray the unpainted metal door with a mixture of sea salt (from our condiments cupboard) and water, until it rusted to a nice reddish brown patina.


Detail Of The Sanded Door
Click on photo to enlarge - ©2008 jim otterstrom

What I hadn't anticipated, was that the steel under the white paint was galvanized, zinc coated to inhibit the formation of rust. Once I realized this, I had to spend many, many, more hours sanding off the stubborn galvanizing so the door would actually rust (nice stuff to breathe that zinc dust, but my beard doesn't accommodate a sanding mask very well).

Days later, once the door was rusting nicely (and my lungs were beginning to recover), I set the jamb and hung it in place. I installed a metal threshold, measuring the bottom clearance to make sure I had allowed enough room for the rubber seal to compress. Everthing looked like it would fit perfectly until I shut the door. It was a pretty tight fit at the bottom seal so I thought I'd open it back up and lube the rubber with some graphite.

But the door was stuck! I pushed & pushed, but the damned thing was frozen shut! Finally, I thrust all my 195 pounds against it with enough force to break the seal, which also peeled off the front metal skin to about six inches up from the bottom.
Hmmmmm! Now, how am I going to repair this disaster?

I got out the tin snips and raggedly trimmed about 1/4 inch off the bottom of the metal skin, screwing it back down with drywall screws.
Perfect!!! Just what my door needed, some authentic jury-rigged character borne of indomitable American ingenuity!

Almost Finished
Click on photo to enlarge - ©2008 jim otterstrom

Add some vintage porcelain enameled PG&E signs to the door, an old Cold War Fallout Shelter sign, and there you have it!

~The Chernobyl Door~

Just beautiful!!!
If I do say so myself...

I still have to distress (beat up with secret aging techniques) & paint the cheesy spliced jambs with some appropriate color, like flat olive drab or battleship gray, and, add a few more of my fence signs at the left of the door, but you get the idea.


;~)

Labels: , , , , , , ,

More Details...

1937 Ford Porchlight Click on photo to enlarge - ©2008 jim otterstrom

I cut the front off a 1 gallon can of Star Olive Oil to use as a rain shield over the porchlight.

It worked perfectly during our big snowstorm keeping moisture away from the fixture, and the little 6.5 watt night-light.

A Locally Historic Fence SignClick on photo to enlarge - ©2008 jim otterstrom

I clipped this sign, some 25 years ago, from a chain link fence around an abandoned industrial building near the old San Bernardino rail yards just before the place was demolished.

The address where this iron works business was located, 368 Third Street, is about 1/2 block east of the present San Bernardino County courthouse.

I don't know exactly how old this sign is (check out that phone number) but I did a search of Allen & Sons Iron works and found records of their existence in San Bernardino from the early 1880s through at least 1913.

Allen Iron Works built Hose Wagon Number 1 for the fledgling San Bernardino Fire Department back in 1890. The fire wagon has been restored and is now owned by the San Bernardino Historical And Pioneer Society (scroll down to the 6th image at this link to see hose Wagon #1). The beautifully restored wagon has participated in Pasadena's Rose Parade several times in recent years.

Allen Iron Works, an old blacksmithing outfit, is also listed as buying the first car ever sold by Carey's Fine Automobiles in 1913, a 1911 Buick.

Carey's Fine Automobiles is still in business today, in San Bernardino.

My guess is that this sign is from the very early years of the 20th Century.

A wonderful find.

Hula Girl Beer Tap Click on photo to enlarge - ©2008 jim otterstrom

My friend Craig, who also cast the Ford script under the porchlight, is setting me up with the equipment I'll need so we can have craft beers on tap at the very local Earth Home Garden pub.

I found the Hula Girl Tap Handle on eBay.

One of these days you are likely to hear a chorus of off-key voices singing the words of John Prine right here at EHG.

Let's Talk Dirty In Hawaiian - ©1988 John Prine

Well I packed my bags and bought myself a ticket

For the land of the tall palm tree

Aloha old Milwaukee...
...Hello Waikiki
I just stepped down from the airplane...
...When I heard her say,
"Waka waka nuka licka, Waka waka nuka licka
Would you like a lei?"

chorus

Hey! Let's talk dirty in Hawaiian

Whisper in my ear

Kicka pooka mocka wa-wahini

Are the words I long to hear

Lay your coco-nutta on my tiki

What the hecka mooka mooka dear?

Let's talk dirty in Hawaiian

Say the words I long to hear


It's a ukulele Honolulu sunset
Listen to the grass skirts sway
Drinking rum from a pineapple
Out on Honolulu bay
Steel guitars are playing
While she's talkin' with her hands
Gimme gimme oaka doka make a wish I wanna poka
Words I understand
chorus
Hey... Let's talk dirty in Hawaiian
Whisper in my ear
Kicka pooka mocka wa-wahini
Are the words I long to hear
Lay your coco-nutta on my tiki
What the hecka mooka mooka dear?
Let's talk dirty in Hawaiian
Say the words I long to hear
Well, I boughta lotta junka with my moolah
And I sent it to the folks back home
I never had a chance to dance the hula
Well, I guess I should have known
When you start talking to the sweet wahini
Walking in the pale moonlight
Oaka noka whatta setta nocka-rocka-sis-boom-bockas
Hope I said it right
chorus
Oh... Let's talk dirty in Hawaiian
Whisper in my ear
Kicka pooka mocka wa-wahini
Are the words I long to hear
Lay your coco-nutta on my tiki
What the hecka mooka mooka dear?
Let's talk dirty in Hawaiian
Say the words I long to hear
Let's talk dirty in Hawaiian
Say the words I long to hear
Aloha...
postscript
The ornate cast iron piece to the right of the hula girl tap is part of an old treadle sewing machine base I found in a burned down homestead in a remote part of Topanga Canyon back in October of 1972. I've had it hanging on a wall somewhere ever since.


Need A Post Office Box?
Click on photo to enlarge - ©2008 jim otterstrom
When the now defunct Bay Post Office in Boulder Bay at the west end of Big Bear Lake was decommissioned about 20 years ago I was given a couple of the old P.O. Box doors from the place. I was the window clerk there when the little substation in the Boulder Bay Market was shut down.
These beautiful old bronze castings make a nice addition to the Temple wall. I have the combinations and the boxes work perfectly after probably 70+ years of hard use.

If anyone knows the approximate time in postal history that this type of twin dial alphabetical combination box was made, I'd love to know.

My guess is that they are from the 1920s or '30s at the latest.

Old Window Framed And Installed
Click on photo to enlarge - ©2008 jim otterstrom
I resurrected an old broken window from my very early days of stained-glass work and used it for the counter-window of the pub portion of my little multi-purpose room.
You can see a better picture of it here.


An Inside View
Click on photo to enlarge - ©2008 jim otterstrom
A local contractor friend gave me some beautiful leftover 3/4 inch birch-faced plywood from a kitchen cabinet job, so I used it for the inside front wall.
Here you can see a little of the progress on the interior space but there is still much work to be done.

Labels: , , , , ,

Monday, November 07, 2005

Our Finished Floor


Click on photo to enlarge

I finally finished our living room floor on Saturday morning and none too soon as it's supposed rain or snow tomorrow.

I haven't added the baseboards yet because we needed to get the furniture in off the porch before the weather hits, but I can measure those, cut & finish them outside when the weather permits, and just move the furniture a bit to nail them in place.

The floors came out nice and Peggy is very happy with them so I think I made points there!

Blogger Dread Pirate Roberts asked a couple of questions about the floor so I'll answer those here.

1. The tiny spaces between a few of the boards will collect dust and crud but cleaning & waxing will eventually seal them over.

2. Because I used standard 1" x 12" pine planks from the local lumberyard I had to consider the possibility of the wood cupping or warping so I decided to both glue and nail the planks to the plywood sub-floor. I used a non-flammable, supposedly non-toxic adhesive, Taylor's 4071 meta-tec floor adhesive, and I nailed the planks, 3 nails across, every 2 feet. I also acclimated and further dried the planks by stacking them in the house for two months with spacers between each plank to allow for air circulation. The floor is nice & flat with no signs of cupping.

The pine floor is finished with OSMO Hardwax Oil, an environmentally safe product from Germany that is non-toxic & recommended for use on children's furniture as well. It is primarily made from two waxes, carnauba & candelilla, mixed with sunflower, soybean and thistle oils and a bit of highly distilled benzene-free solvent which evaporates upon drying.

The downside is that I messed my back up again doing all that bending & lifting so it's off to the chiropractor again tomorrow.

But it's a pretty floor and as environmentally friendly as I could make it on our budget and in this location.

Labels: , , , ,

Sunday, October 30, 2005

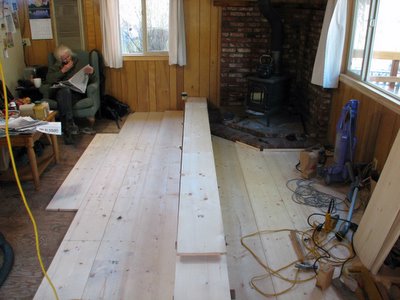
The Planks Are Down!


Click on photo to enlarge

Finally, seven days later, the pine planks are down in the living room ready for me to start sanding them tomorrow.
I thought it would take maybe two days but I forgot about all the other stuff that needs doing around here daily.
Anyhow, sorry for the week of no posts, but I did get a few nature pictures on Saturday that I'll post above.

Labels: , , , ,

Breakfast Among The Planked Pines


Click on photo to enlarge

Peggy enjoys a relaxing breakfast among the pine planks on Saturday morning October 29th.

We had just come back from a walk to the Stanfield Marsh (photos above) and were about to resume work on the floor which is taking much longer than I expected.

Labels: , , , , ,

Sunday, October 23, 2005

Construction Zone


Click on photo to enlarge

The pine planks have been acclimating (note the air spaces between the boards) in the living room for weeks now and today I began laying the boards.

If all goes well I should have the living room floor ready for sanding by day after tomorrow.

Dallas wants his ugly green carpet back.
:~)

Labels: , , , ,

Saturday, March 12, 2005

Lots To Do!


This is some of what we were doing yesterday when I forgot to take pictures.
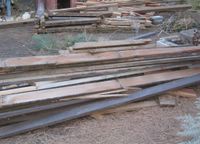
All this wood from the old deck was buried under snow for the winter, in 4 or 5 places around the property, and there are several piles of storm debris here as well, but there was much more we've already cleaned up.
We organized and stacked everything to make our work a bit more manageable
Now I'll pull the nails & hardware from the wood, stacking it in the salvage pile so it can be used for other projects. Posted by Hello

Labels: , , ,

voicexml
voicexml
Creative Commons License
This work is licensed under a Creative Commons Attribution-Noncommercial-No Derivative Works 3.0 Unported License.